Ever gazed at a beautiful origami flower and thought, “I wish I could make that!”? Well, guess what? You absolutely can. Origami, the ancient art of paper folding, is not just about creating intricate designs but also about the joy of transforming a simple paper into something magical. Let’s dive into the world of origami flowers!
Table of Contents
The Beauty of Paper Art

The art of paper folding, or origami, is a testament to human creativity and the wonders of transformation. Think about it: a simple, flat sheet of paper, seemingly lifeless and static, can be breathed into life, taking on shapes and forms that defy its original nature. This metamorphosis is akin to watching a caterpillar cocoon itself and emerge as a vibrant butterfly.
It’s a journey of a humble material, guided by human hands, bursting forth in creativity to become something entirely different. The process, the patience, the intricate folds, and the final product – every stage is a dance of artistry and imagination. It’s a reminder that beauty often lies in the simplest of things, waiting to be discovered and appreciated.
Materials Needed

your origami journey requires more than just enthusiasm. It’s essential to be equipped with the right materials. Just as a painter needs the right canvas and paints, an origami artist needs the right paper and tools. These materials are the foundation of your artwork, influencing not just the ease of creation but also the final appearance and durability of your origami flower.
Choosing the Right Paper
The paper is the soul of origami. Its quality, texture, and color play a pivotal role in the outcome of your creation. For origami, especially flowers, you’d want paper that’s thin enough to fold easily but sturdy enough to hold its shape.
- Origami Paper: This is a specialized paper made explicitly for paper folding. It’s thin, crisp, and comes in various colors and patterns. If you’re serious about origami, investing in this paper is a good idea.
- Other Thin Papers: Not everyone might have origami paper lying around, especially when starting. But don’t let that deter you! Other thin papers, like kite paper or even some wrapping papers, can work in a pinch.
- Texture and Color: The texture of the paper can add another dimension to your origami flower. A slightly textured paper can give a more natural, petal-like feel. As for color, while traditional origami paper comes in solid colors, don’t be afraid to experiment with patterned or gradient papers. Remember, the color you choose will set the mood of your flower. Want a realistic rose? Go for deep reds or soft pinks. Looking for something whimsical? Pastel shades or even metallic papers can be your pick.
Remember, there are recommendations, and there are no strict rules. Origami is as much about personal expression as it is about technique. So, choose your paper wisely, but more importantly, choose what resonates with you.
Essential Tools for Pink Paper Flower Crafts
When it comes to origami, the magic primarily happens between the paper and your fingers. However, a few tools can enhance the precision and finesse of your creations:
- Bone Folder: This is a flat, polished tool, often made from bone (hence the name), plastic, or bamboo. Its primary purpose is to flatten and sharpen creases. If you’re aiming for crisp, clean folds, a bone folder is invaluable. It’s especially useful when working with thicker papers that resist sharp creases.
- Scissors: While traditional origami is all about folding without cuts, some modern designs and variations might require a snip here and there. A sharp pair of scissors ensures clean cuts without fraying the paper’s edges.
- Tweezers: For intricate designs or tiny folds, tweezers can be a lifesaver. They allow for precision, especially in tight spots where fingers might be too cumbersome.
Step-by-Step Guide to Making Origami Flowers
Origami is a dance of fingers and paper, a sequence of folds that lead to beautiful creations. If you’re a beginner, starting with the basics is crucial. One of the foundational folds for origami flowers is the petal fold. Here’s a more detailed guide:
The Basic Petal Fold
- Preparation: Lay your square piece of paper on a flat surface. If your paper is colored on one side, start with the colored side facing down.
- Diagonal Folds: Gently fold the paper diagonally from one corner to the opposite, forming a triangle. Crease well and then unfold. Repeat with the other two corners. You should have two intersecting diagonal creases forming an ‘X.’
- Forming the Petal: Now, hold the paper by two opposite corners and push them towards each other. The paper will naturally start to collapse along the creases you’ve made. Flatten it into a triangle shape. This is your basic petal fold.
Assembling the Flower
Origami flowers often require multiple petals or units. Once you’ve made the necessary number of petals, it’s time to assemble them into a flower:
- Tucking and Joining: Each petal will have flaps and pockets. To join two petals, tuck one petal’s flap into the next’s pocket. This interlocking method ensures the flower holds its shape.
- Securing the Flower: While many origami designs stay together without any adhesive, sometimes a design might need a bit more stability. In such cases, use a tiny dab of glue at the joining points. If you’re using glue, ensure it’s clear and dries without leaving marks.
- Final Touches: Once assembled, you can gently curve or shape the petals for a more natural look. Some artists even like to add a stem, made from rolled paper or wire, to complete the flower.
Types of Origami Flowers You Can Create
Origami, with its rich history and global appeal, has given birth to countless flower designs. From the simplest blooms to the most intricate masterpieces, there’s a flower for every skill level and aesthetic preference. Here are two of the most iconic origami flowers:
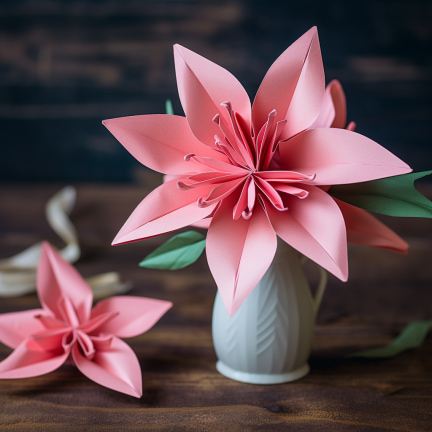
The Classic Lily
The origami lily, also known as the iris, is a symbol of elegance and simplicity. Its design captures the essence of the flower beautifully:
- Design Features: The lily is characterized by its pointed petals that open up to reveal a deep pocket or bell in the center. This pocket can be further modified to create a more detailed pistil or stamen, adding to its realism.
- Origins: While the exact origins of the origami lily are hard to trace, it’s a design that has been passed down through generations, making it a staple in the origami community.
- Uses: Due to its classic design, the lily is often used in bouquets, table centerpieces, and as standalone decorations. When made with waterproof paper or treated post-folding, they can even float on water, making for beautiful pond or bowl decorations.
The Delicate Pink Rose
The origami rose, especially the Kawasaki Rose, is a testament to the intricacies possible with paper folding:
- Design Features: The rose stands out with its layered, spiraled petals, mimicking the tight bud or the blooming flower. The folds are more complex, often involving both inside and outside reverse folds, making it a challenge for many.
- Origins: The Kawasaki Rose, one of the most famous origami roses, was designed by Toshikazu Kawasaki. It’s a design that has inspired many variations, each adding a unique touch to the original.
- Uses: Given its beauty and complexity, the origami rose is often gifted as a token of appreciation, love, or admiration. It’s a favorite for Valentine’s Day, anniversaries, and other romantic occasions.
Tips for Perfecting Your Origami Flower
Origami is an art, and like all arts, it requires practice, patience, and a touch of personal flair. Here are some tips to help you on your journey:
Ensuring Symmetry
Symmetry is the backbone of a well-balanced origami flower. Here’s how to achieve it:
- Consistent Creases: Always ensure that your creases are sharp and consistent. A bone folder can be a great help in this.
- Alignment: When folding, align the edges of the paper perfectly. Even a slight misalignment can throw off the symmetry.
- Checkpoints: Use the creases and intersections as checkpoints. Ensure they meet perfectly as you fold.
Adding Personal Touches
While traditional origami focuses on the purity of folding, there’s no harm in adding your personal touch:
- Decorative Elements: A sprinkle of glitter, some sequins, or even small gemstones can add a touch of sparkle to your flower.
- Coloring: Watercolor washes, colored pencils, or markers can be used to add gradients, shades, or patterns to your origami.
- Scent: A light spritz of perfume or essential oils can make your origami flower aromatic. Imagine a rose that not only looks but also smells like the real thing!
Wrapping Up Pink Paper Flower Crafts
Origami flowers are more than just paper art. They’re a reflection of patience, precision, and creativity. So, the next time you fold, remember – it’s not just about the end product, but the journey too. Happy folding!